Starting a family tradition is a sure fire way to create unforgettable memories! October 2010 was the 2nd annual Halloween Party my sister, Jaime has Hosted in her home. Inspired by her love for party planning, and the happiness of her children, it's a guaranteed good time to be had by all!
Food: Below are a few of the snacks offered during the party.
 |
| Dirt Cake |
Ingredients
- 1/2 cup butter, softened
- 1 (8 ounce) package cream cheese, softened
- 1/2 cup confectioners' sugar
- 2 (3.5 ounce) packages instant vanilla pudding mix
- 3 1/2 cups milk
- 1 (12 ounce) container frozen whipped topping, thawed
- 32 ounces chocolate sandwich cookies with creme filling
Directions
- Chop cookies very fine in food processor. The white cream will disappear.
- Mix butter, cream cheese, and sugar in bowl.
- In a large bowl mix milk, pudding and whipped topping together.
- Combine pudding mixture and cream mixture together.
- Layer in flower pot, starting with cookies then cream mixture. Repeat layers.
- Chill until ready to serve.
- Add artificial flower and trowel. Enjoy!
 |
| Kitty Litter Cake |
Ingredients
- 1 (18.25 ounce) package German chocolate cake mix
- 1 (18.25 ounce) package white cake mix
- 2 (3.5 ounce) packages instant vanilla pudding mix
- 1 (12 ounce) package vanilla sandwich cookies
- 3 drops green food coloring
- 1 (12 ounce) package tootsie rolls
Directions
- Prepare cake mixes and bake according to package directions (any size pan).
- Prepare pudding according to package directions and chill until ready to assemble.
- Crumble sandwich cookies in small batches in a food processor, scraping often. Set aside all but 1/4 cup. To the 1/4 cup add a few drops of green food coloring and mix.
- When cakes are cooled to room temperature, crumble them into a large bowl. Toss with 1/2 of the remaining cookie crumbs, and the chilled pudding. You probably won't need all of the pudding, you want the cake to be just moist, not soggy.
- Line kitty litter box with the kitty litter liner. Put cake mixture into box.
- Put half of the unwrapped tootsie rolls in a microwave safe dish and heat until softened. Shape the ends so that they are no longer blunt, and curve the tootsie rolls slightly. Bury tootsie rolls randomly in the cake and sprinkle with half of the remaining cookie crumbs. Sprinkle a small amount of the green colored cookie crumbs lightly over the top.
- Heat 3 or 4 of the tootsie rolls in the microwave until almost melted. Scrape them on top of the cake and sprinkle lightly with some of the green cookie crumbs. Heat the remaining tootsie rolls until pliable and shape as before. Spread all but one randomly over top of cake mixture. Sprinkle with any remaining cookie crumbs. Hang the remaining tootsie roll over side of litter box and sprinkle with a few green cookie crumbs. Serve with the pooper scooper for a gross Halloween dessert.
 |
| "Brain" Cheese Ball |
Ingredients:
- 2 - 8 oz pkgs of cream cheese (room temp)
- 1 small onion diced
- 1/2 tsp. hot sauce
- 1/2 tsp. Worcestershire sauce
- crushed pecans
Directions:
Place a piece of Reynolds Wrap with Saran Wrap on top of it on counter so you are ready to transfer cheese ball to it to store.
Place a ll of the above ingredients in a lg. bowl. WASH HANDS!
Mix all ingredients together with hands (you lose a lot of stuff by using a mixer buy you could do that if you prefer not to get your hands soiled), folding cheese over and over until all the fluids are absorbed and all color is worked in.
Place mass on Saran Wrap. Sprinkle with crushed pecans.
Shape into a brain.
Wrap tightly and refrigerate (best if made the day ahead)

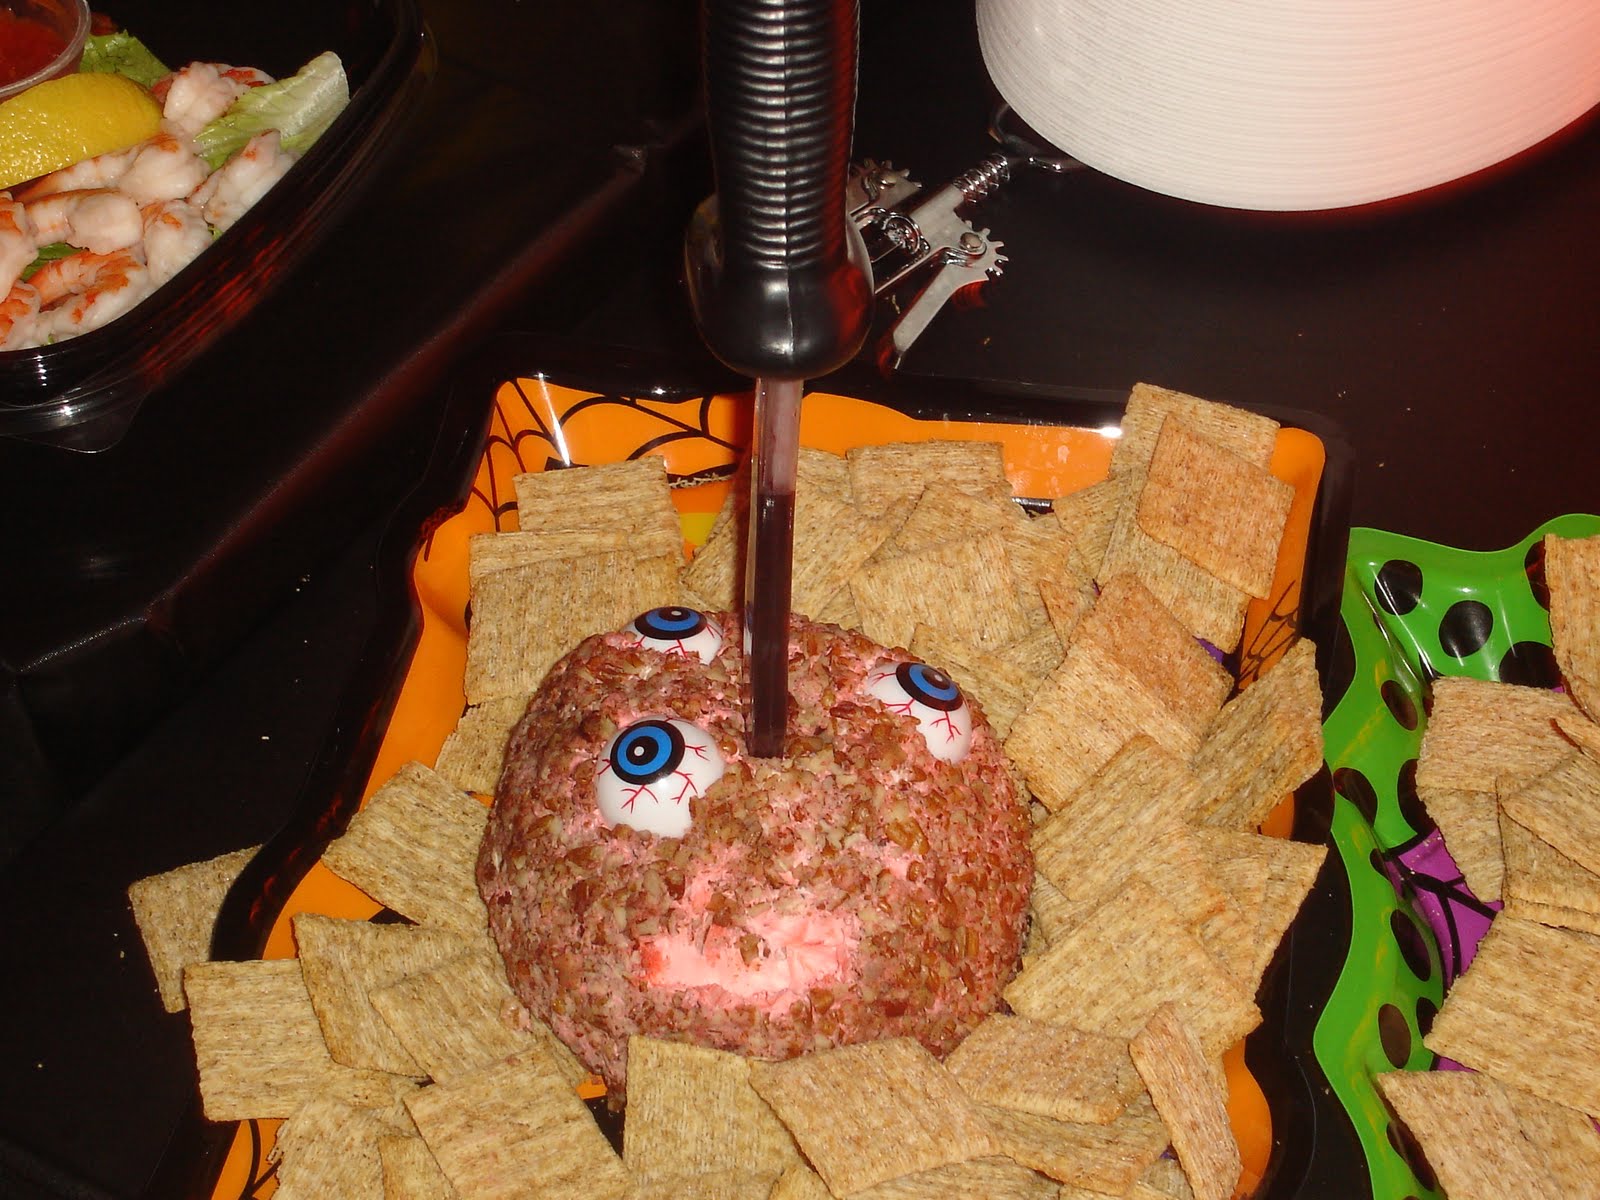
Here is the same cheese ball used a few Halloweens earlier. A few drops of red food coloring was used for dramatic effect. Also 3 plastic eyeballs and a large toy knife used for serving.
Colorful fun Halloween treats!

 |
| "blood splattered" food tags |
 | ||||
| 2009 Halloween Bar |
 |
| Wine and 2 liter spooky bottle labels extends the Halloween theme to your bar! |
 | ||
| 2010 outside Halloween Bar - Hallow out pumpkins, add ice and make them into beer coolers! |
***
Outdoor Activities: Haunted house, pumpkin bowling, graveyard tour
Haunted House

The Haunted House was held in the garage. When entering through the door you begin the tour in "Hell", greeted by the devil in his fiery lair. You walk through fog, and hear the moans and screams of his tortured souls. The tour carried on to the other side of the garage which houses the witch's lair. The witch, shared with the children all the terrifying ingredients she was adding to her brew (In random sized clear jars, put various colored veggies, spaghetti, fruits, etc. Allow them to feel the ingredients, give them spooky names and let their imagination do the rest)

 |
| Backdrop created on cardboard - hand painted scary forest |
 |
| 2009 Graveyard |
 | ||
| Styrofoam headstones - used in backyard graveyard - Halloween 2009 |
How to make handmade headstones (taken from eHow.com)
- First you will need to cut your tombstones from the Styrofoam. Trace a pattern or free hand your own tombstones. Tombstones come in different shapes and sizes, so draw a collection of different sizes. Once you're done tracing or drawing, you can use a sharp knife to cut out the tombstones. This part can be tricky, so make sure to take your time so you don't tear the Styrofoam.
- Once you cut out the tombstones, you can begin to paint them. Switch up the colors between black, gray and white to make your tombstones different. You can also use sponges to create a fun effect. Spray the tombstones with a sealer so that the paint holds up no matter the weather.
- Once the tombstones dry, you can decorate them to look old, weathered and cracked. Now is also the time to add words to the tombstones, such as "R.I.P." Create fun and scary epitaphs.
- After they completely dry, stick the dowels or stakes into the bottom of the tombstones. You can try and seal the stakes or dowels with glue. You may need to use the knife to poke holes into the Styrofoam to make it easier to put in the stake or dowel.
 | |
The same handmade headstones used as front yard decor
Halloween 2010
 |

***
Inside decor

Hand painted slate

Anyone thirsty?

Hand painted gourds
 | |
| Bathroom mirror decor |
 | ||||
| d.i.y. inexpensive Halloween wall art |
Go to www.faceinhole.com and put your face on the body of almost any person. In this photo, I was trying to replicate old fashioned Victorian photos with the faces of my friends and family. Placed on a cobweb invaded fireplace mantle gives these nearly free photos an erie presence.


Picnik.com is a great Halloween editing tool. It was used to enhance the goblin and vampire eyes as well as the vampire fangs.
 | ||
| A family that drinks blood together stays together....something like that. |
Faceinhole.com
 |
| Sister and Brother-in-Law as "American Gothic" FuntasticFace.com... ...another great site to edit your photos Halloween style! Oh, and it's free!   Picnik.com    FuntasticFace.com   *** |
 |
| If you have tape, here is a great floor decoration |

A confident lifestyle often includes experimenting with prints and colors. This blog encourages that approach. The lively design of Below Deck Mediterranean S10 Aesha Scott Fish Print Dress reflects bold yet wearable fashion. Such pieces refresh personal style. The content is well written and relatable.
ReplyDelete